|
ICON Community Interface 0.4.0
|
|
ICON Community Interface 0.4.0
|
The Community Interface (ComIn) organizes the data exchange and simulation events between the ICON model and "3rd party modules". While the adapter library is coded in Fortran 2003, it offers interfaces for incorporating plugins developed in C/C++ and Python. This document serves as a comprehensive guide for new users (plugin developers).
In addition to this guide, the following resources are available for further assistance:
If you have published a paper using or describing ComIn, please expand the list yourself in a gitlab issue or contact comin.nosp@m.@ico.nosp@m.n-mod.nosp@m.el.o.nosp@m.rg for the publication to be added.
Please cite this work if you are publishing results using ComIn.
2025
Hartung, K., Kern, B., Dreier, N.-A., Geisbüsch, J., Haghighatnasab, M., Jöckel, P., Kerkweg, A., Loch, W. J., Prill, F., and Rieger, D.: ICON ComIn – the ICON Community Interface (ComIn version 0.1.0, with ICON version 2024.01-01), Geosci. Model Dev., 18, 1001–1015, https://doi.org/10.5194/gmd-18-1001-2025, 2025.
This section does not contain any publications yet. Be the first to contribute here!
Various ComIn plug-ins are available online and can serve as templates for your own plug-in developments.
First of all, in the ComIn Exercise Repository, you can find Jupyter notebooks that cover following topics:
Besides these Jupyter notebooks, ComIn is bundled with several example plugins. In the following section there is a quick start guide on using these plugins with ICON as the host model. These examples are also included in the following, more extensive list of application plug-ins. This list also contains external (partly closed source) projects and is intended as a point of reference and orientation. For more information and to contact the respective authors, please send an email to comin.nosp@m.@ico.nosp@m.n-mod.nosp@m.el.o.nosp@m.rg.
Finally, the ComIn repository also contains a dummy cmake project in test/downstream_project which might serve as a starting point for the cmake build system.
In order to use the plugins with ICON, the first step involves building the ICON and plugins. The instruction of building and using the plugins is explained here for the Levante_gcc and the DWD_nec platforms:
Clone the ICON repository, which is publicly available under the BSD-3-C license:
After cloning ICON, the example plugins can be found in externals/comin/plugins. In this folder there are different examples written in Fortran, C and Python:
Simple ComIn plugin written in the Fortran programming language | |
Simple ComIn plugin written in the C programming language | |
Simple ComIn plugin written in Python, using the ComIn Python adapter | |
Add variables to ICON including metadata Access prognostic fields of ICON, e.g. humidity tracers, including conditional usage of graupel Access metrics data (height of half levels) |  |
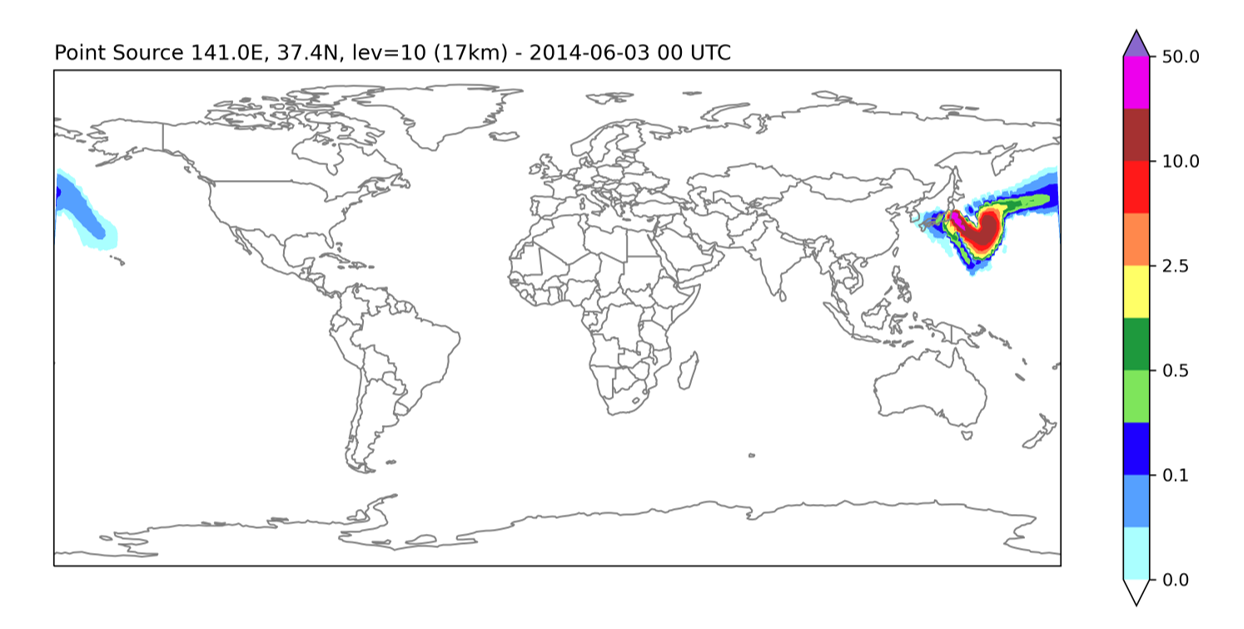
▶ point_source.py (Python) Request a tracer that participates in ICON’s turbulence and convection schemes. add point source emissions to this tracer, update the tracer with tendencies received from ICON’s turbulence and convection schemes. This plugin also shows how a grid point search in Python using SciPy can be done. |
|
To enable the plugins, one or more entries are added to ICON's namelist comin_nml (which is part of the namelist file "atmo_namelist"). Specify the plugin information in the order you want to use them. The different items of plugin_list are
name: the name of the plugin.plugin_library: the shared library file associated with the plugin.primary_constructor (optional): name of the primary constructor. It must be specified if it is not comin_main.options (optional): offers the possibility to pass a character string (e.g. a python script filename) to the plugin.comm (optional): denotes the name of the MPI communicator that is created for this particular plugin. This is useful when exchanging data with other running processes. The parameter comm can be left as an empty string if the application does not require a communicator for this plugin.
Note: The first two components are mandatory to set.
mpi4py package should be used by the plugins. We recommend to use the Python installation contained in Levante's spack install tree. However, the package py-mpi4py is not contained there, therefore we created a custom spack install tree which can be used by placing the following file in your home directory: point_source.py example the scipy package is required which can also be found in the community-spack and can be loaded with --enable-bundled-python=comin configuration option is used to build the ComIn Python adapter.It is recommended to adjust your run script template before configuring ICON. This modified version of your template will be copied to the build/run subdirectory then.
Modifying your experiment's template involves two parts. First, the &comin_nml namelist needs to be added to the namelist "atmo_namelist" (see above).
In addition, you need to set the path of your plugin's shared library in the LD_LIBRARY_PATH. To accomplish this, there are two options available.
add_comin_setup in the run script which does the same automatically. To use this function your basedir variable must be set to the build directory of your ICON installation. The following commands copy the modified version of your template to the build/run subdirectory and launch the batch job
An alternative option is to run your experiment on interactive nodes. Allocate resources for a suitable (cheap!) cluster queue on Levante and wait for the interactive job to start:
Then run the test interactively (remember to make your $BASEDIR known to the new shell: export BASEDIR= ...):
Note that the support for ComIn plugins written in the Python programming language is limited to the x86 NEC Vector Hosts. Native support for task on the NEC Vector Engines is currently under investigation.
VE_LD_LIBRARY_PATH. add_comin_setup . This function does the same for both vector host and vector engine automatically. The initial stage involves choosing the preferred programming language, which can be either Fortran 2003, C/C++ or Python. As an illustration, provided here is a guide on creating a plugin using Fortran.
Each plugin must have three parts:
The plugin allows users to write subroutines that can be called at predefined events (entry points) throughout the model simulation. The primary constructor registers the plugin, and it especially registers additional variables and callback functions. Basically, the primary constructor contains the following steps:
version_no_major in the data structure version is 0.Plugins are allowed to register additional model variables for ICON. A list of to-be-created variables made known to the ICON via the function comin_var_request_add.
var_descriptor is required to describe (and uniquely identify) a model variable in ICON. lmodexclusive: Whenever a plugin calls comin_var_request_add, there is a check to determine if the requested variable is already registered. In this case, the existing variable will be used instead of creating a new one. However, if the variable exists and is either exclusively requested in the current call or was exclusively requested before, the model aborts based on the lmodexclusive setting.tracer flag (part of the metadata). Apart from that aspect it is not possible to create additional variable containers via the adapter library. Note that it cannot be assumed (if only because of the "sharing" of variables between multiple ComIn plugins) that the tracers generated by a module are stored consecutively. -1 (meaning all domains) as part of the var_descriptor for variables with tracer = .true.The primary constructor appends subroutines of the 3rd party module to the callback register via the adapter library subroutine comin_callback_register.
entry_point_id: entry points denote events during the ICON model simulation, which can trigger a subroutine call of the plugin. Entry points are denoted by named integer constants. The table of available entry points is available in the technical documentation.fct_ptr: this is the callback function. Callback functions do not have additional arguments or return values. The callback function has to be interoperable with the C processor (for Fortran, this requires the BIND(C) attribute; see the technical documentation).The descriptive data structures contain information on the ICON setup (e.g. Fortran KIND values), the computational grid(s), and the simulation status. All descriptive data structures are treated as read-only (seen from the perspective of the 3rd party plugins). However, this read-only nature is (currently) not enforced. For efficiency reasons, the adapter library directly uses pointers to ICON data structures where possible. This holds mostly for components of p_patch, while non p_patch descriptive data are copied from the host model.
A secondary constructor is called after the allocation of ICON variable lists and fields and before the time loop. It needs to be registered by the primary constructor as one of the plugin's callbacks.
comin_var_get. Basically, comin_var_get(context, var_descriptor, flag, var_handle) returns a variable handle var_handle of type t_comin_var_handle, with which the pointer to the data can be accessed in a second step.context: the name of the entry point.var_descriptor: same as described in primary constructor part.flag: the optional argument flag provides information w.r.t. the data flow. Flags may be combined like flag = IOR(COMIN_FLAG_READ, COMIN_FLAG_WRITE). It is important to highlight that when the comin_var_request_add procedure is executed, a variable is not immediately created. This step only involves the registration of a new variable. To use this variable later, it must be queried, similar to the other variables, using the comin_var_get function with flag=COMIN_FLAG_WRITE.comin_var_get registers the access to a variable and returns a variable handle.Code example:
The 5D pointer is than accessed via thr type-bound procedure get_ptr.
Code example:
Note, it is important here to know in advance, of which data type the delivered pointer will be. The integer metadata datatype provides the data type. COMIN_VAR_DATATYPE_DOUBLE, COMIN_VAR_DATATYPE_FLOAT, and COMIN_VAR_DATATYPE_INT are the currently available data types.
There exists a convenience procedure to_3d for accessing 2D/3D fields: In practice, access to fields can be simplified, under the condition that the sequence of dimensions is (jc,jk,jb). This exact dimension sequence is (currently) fulfilled by the ICON model. In this case, a 3D pointer variable REAL(wp) :: slice(:,:,:) can be generated directly from the handle using the procedure.
Python plugins can be attached to ComIn via the Python adapter which is located in the plugins directory in the ComIn source code. It is compiled with ComIn if COMIN_ENABLE_PYTHON_ADAPTER is enabled in the CMake configuration, see the build instructions above. The Python adapter embeds a Python interpreter, which also has the comin Python module available. This module contains all the functions, variables, constants and data structures of the Python language API. When including the Python adapter in the namelist, the Python plugin script must be specified as the options, which can be modified while the actual ComIn plugin Python adapter (libpython_adapter.so) remains unchanged. This script is executed in the primary constructor of the Python adapter. Further callbacks can then be registered by decorating functions with entrypoints.
In principle the technical development process of a plugin can be carried out without the presence of the ICON host model, see the section "Build Instructions for ComIn Plugins" below. In general, however, the objectives of a plugin are too complex and involve too many variables to allow development independent of an ICON run. On the other hand, starting the complete model run is resource and time intensive, which in turn limits the plugin development. For this case, the ICON Community Interface offers the replay_tool tool, which is described in the following.
Located in the replay_tool subdirectory, a small executable comin_replay is distributed together with the ComIn source code. This tool performs the task of making previously recorded data sets (ICON variables, descriptive data) available for ComIn plugins. It therefore acts as a fake host model, which simply reproduces data records that were previously captured with the ICON model.
Let us assume, for the time being, that such data records already exist. They are stored in the NetCDF file format, and it is implicitly assumed that the replay process is executed with as many processes as the ICON simulation itself (each NetCDF file stores the partition of a single MPI task).
To illustrate the replay process, we attach the "simple_python_plugin" explained above to comin_replay. This will enable us to develop additional functionality in the "simple_python_plugin", using real data input recorded from the ICON model.
The replay tool expects a fortran namelist as command-line argument, that contains a definition of the comin_nml and a replay_tool_nml. It looks quite similar to the usual comin_nml for ICON, with an additional plugin libcomin_var_replay_plugin.so that loads the variables back into memory. Note that there is no need to specify the list of available variables or the entry point where the variable has been recorded - this is automatically retrieved from the recorder NetCDF files.
Execution happens in a run script with the same parallel queue settings as the ICON run. You might, for example, create a copy of the full ICON run script, simply replacing the MODEL=.../icon setting by the comin_replay executable. Note, however, that usually the ICON model run comprises additional MPI tasks, e.g., for asynchronous output writing. Therefore, the number of MPI tasks has to be decreased accordingly for the replay run by adjusting the --ntasks argument of the srun command.
Note: It is currently not supported to add the var_replay_plugin plugin multiple times to the comin_replay run.
Two separate plugins are provided which capture the ICON host model data during a full model run. Both are located in the replay_tool subdirectory and compiled during ComIn's build process:
build/replay_tool/libcomin_run_recorder_plugin.so: This plugin dumps all descriptive data to disk. It is attached to the ICON model as a secondary constructor callback, which collects most of the descriptive data. During the remaining callbacks, additional time-dependent descriptive data is recorded.build/replay_tool/libcomin_var_recorder_plugin.so: This plugin captures the data arrays of a given set of variables and for a given entry point. Before you attach this plugin to the ICON model run, the hard-coded entry point constant ep has to be set in the source code file replay_tool/comin_var_recorder_plugin.F90. The list of variables which shall be recorded is provided as a comma-separated string via the namelist parameter comin_nml :: plugin_list(1)options.Example: The default entry point in the ´comin_var_recorder_plugin.F90 is ep = EP_ATM_TIMELOOP_END. We change this to EP_ATM_WRITE_OUTPUT_BEFORE and rebuiild the recorder plugins.
Afterwards, we can activate the recorder plugins with the following ICON namelist setting, capturing the pressure field pres:
During the ICON run, various NetCDF files are created in the experiments folder; the usual path would be build/experiments/....
<prefix>XXX.nc , where XXX denotes the MPI rank and <prefix> is an optional name prefix.vars_XXX.nc, where XXX denotes the MPI rank.All files contain certain meta-data attributes, e.g. the ComIn version. As described above, they can now be used by the comin_replay tool to facilitate stand-alone plugin runs for development.
Note: Currently, collecting ICON data for multiple entry points requires several independent model runs.
ICON supports massively parallel accelerator devices such as GPUs (Graphics Processing Units). For a detailed description of this parallelization model, see the ICON tutorial (DOI: 10.5676/DWD_pub/nwv/icon_tutorial2025), Section 8.5 "ICON on Accelerator Devices". In the context of the Community Interface, the most important aspect is the handling of the separate GPU and CPU memory. ComIn provides a set of API functions that organize the transfer of variables between a plugin running on either CPU or GPU and a GPU-based ICON simulation. This section describes the use of this API by means of a practical example, executed on the Levante supercomputer of the DKRZ.
As a first step, we set up a Python virtual environment called venv. We need this environment to install the CuPy library for GPU-accelerated computing. CuPy shares the same API set as NumPy and SciPy, allowing it to be a drop-in replacement for running NumPy/SciPy code on the GPU.
The next step is to build a GPU-enabled ICON binary on Levante. We clone the ICON repository,
and create a build directory. Here, we already copy a suitable ComIn+GPU test script to the run/ folder. This test exp.atm_tracer_Hadley_comin_portability is provided together with the ICON source code and runs a ComIn plugin written in the Python programming language, externals/comin/plugins/python_adapter/test/gpu_test.py.
As usual with ICON, users are recommended to run an appropriate platform- or machine-specific configuration wrapper that sets the required compiler and linker flags. This is the config/dkrz/levante.gpu script in this case:
Now all the necessary preparations are done and we have a GPU-enabled ICON binary along with a ComIn Python adapter. Note that these preparations only need to be done once.
Generate the run script with the following command:
Then adjust the account in run/exp.atm_tracer_Hadley_comin_portability.run. Afterwards, to test the setup:
gpu_test.pyIn the following, we will focus on the plugin script itself, i.e. the Python script build/externals/comin/plugins/python_adapter/test/gpu_test.py. In particular, we will explain ComIn's host device copy mechanism, summarized in the following table:
| CPU plugin (Python: NumPy) | GPU plugin (Python: CuPy) | |
|---|---|---|
| GPU ICON | auto. host-device copy | no memcopy required |
| CPU ICON | no memcopy required | - model abort - |
ComIn initially assumes that the plugin is to be executed on the CPU host, regardless of whether the ICON model runs on GPUs or not. This basic setting enables the execution of unmodified "legacy" plug-ins. If the test script is unmodified, fields are copied to the host prior to the ComIn callback.
Besides this, the plugin developer can check the availability of the GPU using the has_device descriptive data info. The following statement prints if an accelerator device is available:
See the Python API documentation for other GPU-related contained in the ComIn descriptive data.
If the plugin is also to run on GPUs (which is often possible without major adjustments thanks to the NumPy replacement module CuPy), then read access to a variable on the GPU can be specified using a flag for comin.var_get: comin.COMIN_FLAG_READ | comin.COMIN_FLAG_DEVICE.
ComIn also catches the error that a plugin should run on the GPU, although ICON itself was not started on GPUs.
As explained above, we can use the CuPy library as a drop-in replacement for running NumPy code on the GPU. To do this, our Python example replaces
with
Our test script automatically recognizes the availability of Cupy, enabling it to run in both execution modes: as a GPU or CPU plugin.
We will now discuss write access to ICON variables. The non-trivial case would be when ICON runs on GPUs, yet a non-GPU plugin needs to write to a variable array. Similar to read access, the porting effort is minimal. A non-GPU plugin that uses ICON on GPUs only needs to set comin.COMIN_FLAG_WRITE; then, comin_callback_context_call automatically takes care of the data transfers. This corresponds to the first column of the following table ("Execution in GPU Section"):
COMIN_FLAG_DEVICE | COMIN_FLAG_READ | COMIN_FLAG_WRITE | execution in GPU section | ex. in CPU section (lacc=.FALSE.) |
|---|---|---|---|---|
| x | update host memory before callback | - | ||
| x | update device memory after callback | - | ||
| x | x | update host memory before callback; update device memory after callback | - | |
| x | x | - | warning | |
| x | x | - | warning | |
| x | x | x | - | warning |
Detail: The right column, "execution in CPU section", on the other hand, refers to sections in the ICON code which have not yet been ported to GPUs. In the (rare) case that an entry point is located in such a section, the access to GPU-enabled variables triggers a warning in ComIn, but no special host-to-device update for read and device-to-host for write access has been implemented.
One final remark on descriptive data structures: Descriptive data structures, such as domain data, are not automatically transferred to the GPU device. Plugins only receive CPU pointers. This is because data structures are complex and plugins do not register for specific items. For GPUs, keeping all data consistent would be necessary, even if much of it is unnecessary.
On the other hand, it is relatively straightforward to synchronise the descriptive data arrays on the fly on the plugin side, and the runtime overhead is negligible since most plugins only require these structures during initialization. We demonstrate this in the following code snippet:
Similarly, it is possible to create a CuPy array and move the data to the current GPU device:
ComIn plugins are shared libraries, attached to ICON using the dynamic loader of the operating system. For building a ComIn plugin we recommend to use CMake. In the first step you should create a separate CMake project and place your plugin there.
In the next step, one must build ComIn. We strongly recommend the out-of-source build (the instructions can be found in the next section). Following that, ComIn offers a CMake config (ComInConfig.cmake) such that it can be easily found in your CMake project. Then, establish a connection between your CMake project and ComIn.
In the next step, generate a CMakeLists.txt in your CMake project with the following lines:
Note: In the example above is assumed you want to build a Fortran plugin. In case of C plugin, the LANGUAGES does not need to be specified. Afterwards, you can create a build directory and build your plugin:
ComIn offers the functionality to test your plugin with the replay_tool emulator using CTest. In particular this can be used in a CI/CD setup for validating that the plugin builds and can be executed. A detailed documentation of the replay_tool and how to generate the input data can be found in the User Guide
To add and configure tests in your projects ComIn provides utility functions.
Online replay data can be added by the CMake command comin_add_replay_data.
This adds a test to your projects which takes care of the download of the data.
To add a test, you can use the comin_add_replay_test CMake function in CMakeLists.txt.
This generates a CTest test with the name your_test and sets up everything to run the replay_tool. Alternatively you can pass a local path to the replay data as REPLAY_DATA_PATH. Further arguments can be found in the CMake documentaton.
To add a plugin to the test use the function comin_test_add_plugin in CMakeLists.txt .
The parameters correspond to the parameters in the namelist (t_comin_plugin_description) for configuring a plugin.
The tests can be executed with ctest or make test. Note that the CMake variable BUILD_TESTING must be set to ON to build the tests.
You can build ComIn without ICON as the host model and test plugins using the standalone replay_tool that comes with ComIn.
If you plan to use the Python API, it is recommended to create a virtual environment for ComIn. For Python 3.12, use these commands:
Load the modules needed to build ComIn using this command:
Clone the ComIn git repository with:
Alternatively, download a public release tarball from https://gitlab.dkrz.de/icon-comin/comin.
Then follow the standard CMake workflow: create a build directory, configure and build.
The CMake command enables:
-DCOMIN_ENABLE_PYTHON_ADAPTER=ON,-DCOMIN_ENABLE_EXAMPLES=ON,ctest command) by setting -DBUILD_TESTING=ON.For debugging, you can use the VERBOSE=1 option in CMake.
Run tests in the build directory with:
If parallel tests fail, add these environment variables to the runscript in the build directory comin/build/test/parallel/run.sh:
(Further details can be found here)
For YAXT functionality, eg. for the replay_tool's halo synchronization feature, you must first install YAXT at a specific path. Then reconfigure by adding this CMake option: -DCMAKE_PREFIX_PATH=path_to_install_yaxt When using YAXT, set the LD_LIBRARY_PATH environment variable to include the YAXT installation path before running cmake.
Stand-alone building ComIn on NEC requires separate builds for both the vector engine (VE) and the vector host (VH).
First step: stand-alone build for VE.
Second step: stand-alone build for VH.